Let us first look at two of the common methods of getting a Looker studio report built and why they are wrong.
Wrong Method 1: Consultant creates a ready-to-use template that you copy to your Looker studio account and become the owner. Though sufficient in some cases, it is a generic template that is not tailored to your business. A report that is tailored to your requirements increases the possibility of getting insights from your data. Unless your goal is to merely checkout Looker studio, you should be getting a report tailored to your business requirements. If that is your goal, here is a ready-to-use Looker studio template for web analytics.
Wrong Method 2: You share access to your apps like Google Analytics, Google Sheets with the consultant. The consultant builds a Looker studio report tailored to your requirements using ‘custom fields’ (required for calculated metrics, clickable page titles etc.). The problem with this method is that some charts will show an error when you copy the report to your Looker studio account: ‘Configuration incomplete: Invalid dimension, metric or filter selected’.

This happens custom fields cannot be copied from one Looker studio account to the other. It is rarely possible to build a useful report without using custom fields. The right method is that consultant uses a report that you already own and does not require to be copied. This steps are detailed below:
- Step I: Add data sources to your Looker studio account.
- Step II: Create a blank dashboard.
- Step III: Share the data sources with your consultant.
- Step IV: Share the blank dashboard with your consultant.
- Step V: Share the app that holds the data with your consultant.
- Step VI: After the report is prepared, remove all access provided to the consultant.
Now, Let us see each step in detail
Step I: Add data sources to your Looker studio account.
- Login to lookerstudio.google.com using your Google account
- Click ‘Data Sources’ in the left navigation
- Click the ‘+’ icon to add a data source
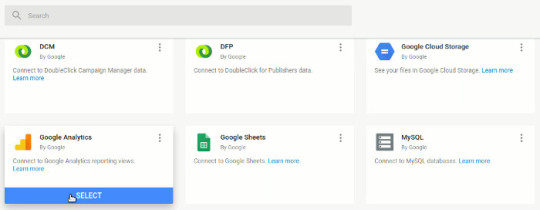
- Browse the list of connectors and select an appropriate connector.
- Now connect the data source. The process to connect depends on the connector selected. In this post, I will use Google Analytics as the example.
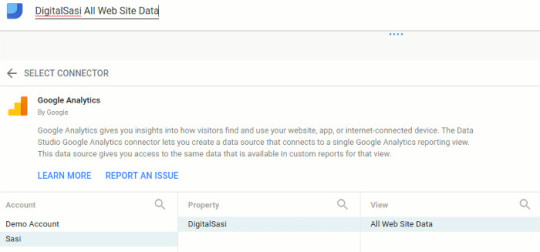
- Select the Google Analytics Account that you want to add. Then select the ‘Property’ and finally the ‘View’ that needs to be added.
- On the top-left side where you see ‘Untitled data source’, enter an appropriate name. Best practice: Your consultant could be working with many clients. When naming your data source, include some form of business identification like your website name.
- Click the CONNECT button. Then, wait a few seconds for the list of fields to load.
- You have successfully added the data source. Go back to the home page by clicking the Looker studio logo on the top-left side of the page.
- Add more data sources if required.
Step II: Create a blank dashboard.
- Click ‘Reports’ in the left navigation.
- Click the ‘+’ icon to create a new report. That opens a blank report.
- On the top-left side where you find ‘untitled report’, enter an appropriate name for the report. Best practice: Your consultant could be working with many clients. When naming your report, include some form of business identification like your website name.
- You have successfully created a blank report.
Step III: Share the data sources with your consultant.
- Click ‘Data Sources’ in the left navigation

- To share a data source with the consultant, open the 3 dot menu and click ‘Share’.
- Enter the consultant’s Gmail id and click Send.
- If there are multiple data sources, repeat this step for each one that needs to be shared.
Step IV: Share the blank dashboard with your consultant.
- Click ‘Reports’ in the left navigation.
- Similar to Step III, open the 3 dot menu, click ‘share’, enter the consultant’s Gmail id and click ‘Done’.
Step V: Share the app that holds the data with your consultant.
You should also share access to the actual apps that hold the data (like Google Analytics, Google Sheets). Though not a technical requirement for creating reports, this will help the consultant study your data and create a report plan that is tailored to your business. The process for sharing access varies for each app. Links for the most used apps are below: Google Anaytics: Add, edit, and delete users Google Sheets: Share files from Google Drive
Step VI: After the report is prepared, remove all access provided to the consultant.
- You must remove access to the report as well as the data source after the work is complete.
- To remove access, open the 3 dot menu and click ‘share’.
- Click ‘Advanced’. You can now see all the users who have access to the report or the data source.
- Remove access the consultant.
- Note: If you have provided access to apps, you should remove those permissions too.